How to run wifite in termux on android

With the help of a terminal emulator and a Linux OS, you can hack WiFi networks as easily as it can be. Wifite is an automated WiFi network hacking tool that supports various attacking modes. It performs handshaking with the AP (Access Point), spoofs client MAC address, injects fake packets to the target AP and also forces the target AP to send out de-authentication packets to all its connected clients. This guide will walk you through how to install and run within termux on android.
With the help of a terminal emulator and a Linux OS, you can hack WiFi networks as easily as it can be. Wifite is an automated WiFi network hacking tool that supports various attacking modes. It performs handshaking with the AP (Access Point), spoofs client MAC address, injects fake packets to the target AP and also forces the target AP to send out de-authentication packets to all its connected clients. This guide will walk you through how to install and run wifite in termux on android.
1. What is WPA/Wi-Fi Protected Access?
Wi-Fi Protected Access (WPA) is a security protocol for Wi-Fi networks. It was created to replace the WEP protocol, which many experts considered to be insufficiently secure. WPA is an implementation of the IEEE 802.11i specification. It is the most commonly used security protocol for wireless networks.
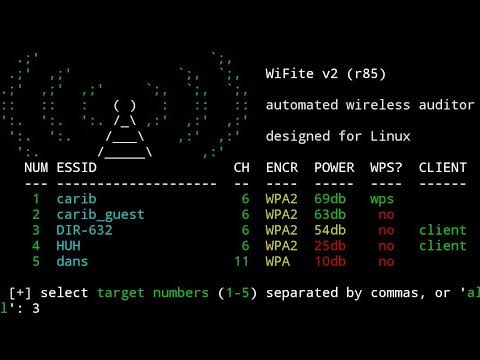
To unlock an access point for hacking mode, you need to figure out its SSID and password. It is important to figure this out quickly as it will help you expose the passphrase quickly after you connect to the access point. To find the access point’s SSID, run this command in a terminal emulator:
The output of this command will look something like this:
If the SSID is not listed, then it is likely that the access point has no password policy. This is a security risk and you should avoid associating with that access point until you have confirmed its security. To find the access point’s encrypted password, run this command, which will print the decrypted password to the terminal:
A plaintext version of the password will look something like this:
In this password, uppercase and lowercase letters, numbers, and symbols are all supported.
To achieve successful authentication, the following three things must be done:
Now, let’s upgrade our tool to hacking mode. This is the only stage that is automatic and you don’t need to follow the steps below.
To install hacking mode in termux, run this command (issue the sudo bash or nano /etc/rc.local before the line above if you do not have bash installed on your device):
The output of this command will look something like this:
If the above output does not look like it matches your system, then you are probably experiencing some issues with your security permissions for the Termux user. Run the following command to check your sudoers permissions:
With the sudoer's permission properly configured, we can now upgrade Ourtermux to support hacking mode. The upgrade will take some time as it applies the patches mentioned above.
2. Understanding the security of a Wi-Fi network
You may not know this, but using public Wi-Fi isn’t always the safest thing to do. Hackers are constantly looking for ways to get into networks and steal information. If you’re using open Wi-Fi at a coffee shop or hotel, anything you do online can be seen by a hacker. Hackers know that WiFi records user-agents and from this, we can connect a user to a particular network or device. A hacking tool like wifite avoids this problem by acting as a middleman between a user and the Wi-Fi network. A wifi scanner can’t do this because it doesn’t know what kind of interface the network adapter has. The tool only needs the IP address of the currently connected network.
We’ll start by doing some hands-on hacking on the Qorvo router. You may need a terminal emulator on your PC, Windows, MAC, or Linux to do all this. It’s recommended to use Termux to do this because Termux supports Linux and Android better than VNC which is often installed on Windows PCs.
First of all, download Termux from here and install it. Next, on the Termux home page, click add new. Give the name Qorvo’s Wi-Fi a descriptive name. When you have done, click on ‘Create Address Space’, then ‘New Network Volume’, and set the name accordingly. Next, click on ‘Add Network Volume’, let’s create a new one called wifite. Next, we need to bookmark this wallet.
E.g., on my PC, I use C:\Users\toky\Downloads\Torvalds Linux Distribution. In Termux, I open the menu bar by pressing escape, and in the left panel, I click on Bookmarks. Then, navigate to the library on C:\Users\toky\Downloads\torvalds\linux, I opened the folder named wifite, and I clicked on the Bookmark. The bookmark is created.
Open the terminal and browse to the directory where you stored the bookmarked directory. A new window will open with a prompt to enter the path to the bookmark:
To prevent hackers from finding the wifite bookmarked directory, in the same window, create a new SFTP folder by typing in the following SCP command.
Commands for install ubuntu-in-termux & Wifite in termux
- First, install Termux on Android
- Then install Root in termux without root Device using ubuntu-in-termux
- Here is the command to install ubuntu-in-termux
apt update && upgrade
apt install git php python python2 -y
git clone https://github.com/MFDGaming/ubuntu-in-termux
ls
cd ubuntu-in-termux
ls
chmod +x *
ls
./ubuntu.sh -y
./startubuntu.sh
Then install wifite2 in termux following these commands
git clone https://github.com/kalicsv/Wifite-2
ls
cd Wifite-2
ls
chmod +x *
ls
apt install termux-tools
apt install reaver
apt install tshark
apt install aircrack-ng
./wifite.py

Not working after ubuntu-in-termux
ReplyDeletechmod +x ubuntu.sh
Deletetry the above line after ubuntu-in-termux.
It will work fine.
This comment has been removed by the author.
ReplyDeleteThis comment has been removed by the author.
ReplyDeleteI needed a fast respond, I read about kelvin hacker and I actually saw a testimony like this about him and I decided to try him out. His approach alone showed his seriousness and professionalism, this hacker is a genius and highly recommended by a lot of people, it was very easy for him to help me spy on my spouse remotely for some token….I was very happy with the service he rendered I came here to testify for what he did for me and I’ll always be grateful to him…the least I could offer is to referring him to you guys. contact him on kelvinethicalhacker@gmail.com and you can reach to him for more information about hacking devices.
ReplyDeleteAFTER STARTING UPBANTU INTERMUX THEN PASTING GIT CLONE < WEBSITE > IT SAYING GIT COMMAND NOT FOUND
ReplyDeleteThis comment has been removed by the author.
ReplyDelete